

Call us: +44 (0)1227 789 649 - Monday to Friday 9am to 5pm
Home Vegetable Growing
Home Vegetable Growing 100 Hours Certificate Course
Course Code:
AHT102 CLD
Level:
3
Start:
Anytime
Finish:
Anytime
Study From:
Anywhere
Tutor Support:
Unlimited Access
Pinterest
Twitter
Facebook
Email
LinkedIn
Facebook
Contact us
PayPal Pay Later
Pay in 3 interest-free payments
-
Choose PayPal at checkout to pay later with Pay in 3.
-
Complete your purchase with the first payment today.
-
Remaining payments are taken automatically.
Pay in 3 is a form of credit, so carefully consider whether the purchase is affordable and how you will make the repayments. Be aware of the possible impact of using Pay in 3 and of missing payments, including making other borrowing more difficult or more expensive. Pay in 3 eligibility is subject to status and approval. 18+ UK residents only. Available for purchases of £30 to £2,000. Terms and conditions apply. PayPal Pay in 3 is a trading name of PayPal (Europe) S.à r.l. et Cie, S.C.A. 22-24 Boulevard Royal L-2449, Luxembourg.
Learn About Home Vegetable Growing
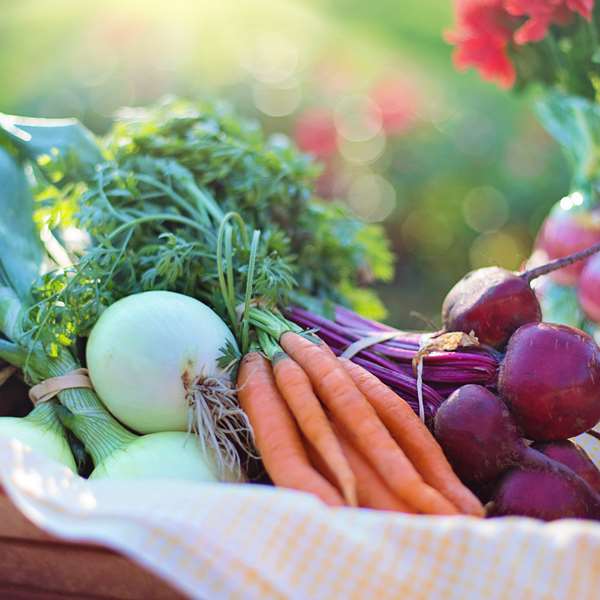
Home Vegetable Growing Online Course
Learn how to grow delicious, fresh, healthy vegetables simply at home with our Home Vegetable Growing Online Course
Produce and enjoy your own delicious vegetables!
This course will help you learn such things as: how to build a veggie garden, understand the principles of cultivation and planting, the main vegetables to plant, how to construct compost storage, gain knowledge of pests diseases and weed control, hydroponic versus greenhouse growing, herbs and uncommon vegetable varieties, watering and irrigation systems, harvesting, storing and using vegetables.
Course Information
Other Categories
Lessons
Lesson Structure: Home Vegetable Growing AHT102
There are 8 lessons:
1. Introduction
- Different ways to grow vegetables
- Understanding various ways to prepare a garden
- Learn the difference between plant names and scientific names
2. Cultivation and Planting
- Organic Growing
- Hydroponics
- Permaculture
- Container gardening
- Greenhouse growing
- Vertical gardens
- Planting Vegetables
- Sources of seeds
- Hybrid seeds
- Storing seeds
- Sowing seeds outdoors
- Sowing seeds indoors
- Transplanting seedlings
- Buying seedlings
- Transplanting crowns, offsets, tubers etc
- Soils and nutrition
- Nutrition
- Nutrient deficient symptoms
- Soil Ph
- Composting
- C/N ratios
3. Review of Major Vegetable Varieties
- Planting in favourable conditions
- The Brassicas
- Pests and diseases
- Harvesting
- Broccoli, brussels sprouts, cabbage, cauliflower, pakchoi, radish, turnip
- The legumes: broad beans, peas
- Other Vegetables: lettuce, onion, potato
4. Pest, Disease, and Weed Control
- Natural Pest and disease control
- Cultural Controls: Choosing the right plant for the right position, choosing healthy plants, choose resistance
- varieties, crop rotation, timed planting, irrigation, mulching, cleanliness, and hygiene
- Physical Controls: Traps, various methods for controlling certain insect pests, repellant devices
5. Hydroponic and Greenhouse Growing
- Growing vegetables in greenhouses
- The right greenhouse
- Greenhouse problems
- What is hydroponics
- Why grow in hydroponics
- What is the best growing system
6. Lesser Grown Varieties and Herbs
- Crop scheduling
- How much seed do you need
- Less common grown vegetables: amaranth, artichoke, asparagus, cassava, chicory, common mint, dandelion, endive, fennel, garlic, ginger, horseradish, leek, okra, pigface, prickly pear cactus, rhubarb, water spinach, watercress, warrigal greens, yams
- Tropical vegetables: sweet potato, taro
7. Irrigation
- When to water
- Testing to see if watering is required
- Watering systems
- Different gardens need different watering systems
- Designing your own system
- Dripper of spray
- Cheap micro-irrigation
- Other vegetables: beetroot, capsicum, carrot, celery, corn, eggplant, parsnip, spinach, silverbeet
8. Harvesting, Storing, and Using Vegetables
- Harvesting
- Storing vegetables
- Preserving and processing your food
- Pickles
- Bottling tomatoes
- Chutney
- Sauces
Freezing
Managing the freezer
Learning Goals
Learning Goals: Home Vegetable Growing AHT102
- Identify a range of different vegetables
- Determine sources and significance for information on vegetable growing
- Describe the planting and cultivation of a range of different vegetables.
- Describe production of some of the varieties of vegetable which are widely and commonly grown by home gardeners.
- Evaluate and determine treatments for a range of common pest, disease and weed problems that affect vegetables
- Determine and describe methods for producing a range of vegetable crops out of season.
- Describe production of some of the varieties of vegetable which are less commonly grown by home gardeners.
- Determine and describe ways of managing the water needs of vegetables in a home garden.
- Describe when and how to harvest different types of vegetable crops.
- Describe a range of methods for storing and using vegetables after harvest.
Practical (Set Tasks)
Practicals:
- Compile a resource file of organisations related to home vegetable growing
- Compile reviews of sixteen different vegetables suitable for growing at home
- Carry out basic soil tests on two different soils
- Obtain or make up a propagating mix
- Make a vegetable garden
- Identify weed species in a vegetable garden and suggest control methods
- Make notes about pests and diseases in a home vegetable garden
- Contact several chemical suppliers and obtain brochures or technical information sheets on weedicides and pesticides appropriate for use on vegetable crops
- Contact a few greenhouse companies and obtain both literature and current prices
- Either write to or visit a company (or companies) which supply irrigation equipment.
- Obtain catalogues, brochures, etc
- Try drying, bottling or freezing a vegetable you have not preserved before.
- List 20 different vegetables with information about their culture and harvest
Examinations
Program Summary
More Information
Your Tutor For This Course:
 Susan Stephenson
 Susan Stephenson
BSc in Applied Plant Biology (Botany) Univ. London 1983. City and guilds: Garden Centre Management, Management and Interior Decor (1984)
Management qualifications in training with retail store. Diploma in Hort level 2 (RHS General) Distinction.
Susan Stephenson is a passionate and experienced horticulturist and garden designer. She has authored three books, lectures at 2 Further and Higher Education Colleges, teaching people of all ages and backgrounds about the wonders of plants and garden design, and tutors many students by correspondence from all over the world.
Susan studied botany at Royal Holloway College (Univ of London) and worked in the trading industry before returning to her first love plants and garden design. She is therefore, well placed to combine business knowledge with horticulture and design skills. Her experience is wide and varied and she has designed gardens for families and individuals. Susan is a mentor for garden designers who are just starting out, offering her support and advice and she also writes, delivers and assesses courses for colleges, introducing and encouraging people into horticulture and garden design.
In 2010, Susan authored a complete module for a Foundation degree (FDSC) in Arboriculture.
Susan holds the RHS General with Distinction. She continues to actively learn about horticulture and plants and (as her students will tell you) remains passionate and interested in design and horticulture.
UNDERSTANDING THE IMPORTANCE OF WATER IN THE VEGETABLE GROWING PROCESS!
Always start with the water!
IRRIGATION
WHEN TO WATER
Plants will need more water in hot, dry or windy conditions, but it is also easier to use water incorrectly at these times.
Naturally, you’ll need to water your plants more often when it’s hot but good watering involves more than turning on the sprinkler every couple of days or standing around with a hose each evening.
TESTING TO SEE IF IT NEEDS WATER
One of the biggest problems in gardening is not watering when it is needed.
Not only can plants suffer from not enough water, they can also suffer when they are watered too much and too frequently.
A simple technique of pushing your finger into the soil can help determine if the soil needs watering. If the finger comes out dry, then it most probably is time to water. If the finger comes out moist and cool, then it could forgo the watering till a little later.
The Dos and Don’ts of Watering
- Avoid watering in the evening – Although this is often a pleasant activity, evening watering isn’t a good idea as it encourages fungal diseases in plants. The water droplets remain on the plants overnight, providing the perfect conditions for the spread of many common fungal diseases, including black spot on roses.
- Don’t water in the middle of the day – Some foliage burns in strong sunlight if water remains on the plant. African violets, gloxinias and newly planted seedlings are particularly susceptible to foliage burn.
- Don’t spray plants lightly with water each day – The water is unlikely to penetrate down to where the roots need it. Over time, the roots will only grow in the top couple of centimetres of soil, where they are subjected to the extremes of heat and cold.
- Don’t apply water faster than it can be absorbed – It will simply run off the surface.
- Don’t waste water by using sprinklers on windy days.
- Don’t position a sprinkler where the water will be sprinkled on roads, driveways, etc.
- Do water early in the morning – The water will have a chance to soak deeply into the soil before the sun gets too hot, and water on the foliage will have evaporated before the hottest part of the day reducing the risk of foliage burn.
- Do water deeply – This encourages the roots to grow downwards, giving a healthier and stronger plant. This reduces the likelihood that the plants will suffer from water stress, particularly if you are unable to water for a few days in very hot weather (e.g. if you are away on holidays).
- Do add plenty of organic matter to soils before planting. This helps improve soil structure allowing better water penetration into the soil, as well as improving the ability of the soil to hold water.
- Do use mulch – This will make a big difference to the amount of water you need to apply. Evaporation of water from the soil can be reduced by up to 70% or more. Be careful though, that you do not use too thick a layer of mulch, as the mulch can act like a sponge when you water soaking up a lot of water preventing it from reaching the soil beneath.
- Some mulching materials, particularly fine materials such as sawdust, can also pack down creating a barrier to water penetration. Use a mixture of coarse and fine materials, and periodically check, using your fingers, to see if the water is penetrating the mulch.
- Think about installing a drip irrigation system. Micro-jets and drippers use much less water than sprinklers and hand watering.
- To take care when applying fertilisers dissolved in water in summer, as they are more likely to burn the foliage in hot weather.
- If you are going to use a sprinkler, use one that produces large drops rather than fines ones which are more readily blown around in the wind, and are more readily evaporated.
Other Ways to Reduce Watering Needs
- Group plants with similar watering requirements together. This allows you to only provide the amount of water all of a group requires, rather than the level of watering the most water-hungry of the plants require.
- Avoid cutting your lawn too low (less than 2-3cm), as the grass won’t have enough leaf material to protect itself from burning.
- Use timers on irrigation systems to ensure they are turned off in case you forget that they are on.
- When washing your car, try and wash your car on your lawn so that the water from the car washing can also water the lawn). Wet the car first, then turn the hose off (either at the tap or at the nozzle), then soap down the car.
- Do one section of the car at a time to prevent the car detergent from drying. Once you have finished “soaping up”, turn the hose back on, and wash the car down.
- Use a broom and shovel to clean your hard surfaced areas (e.g. road gutters), rather than washing them down with water from a hose (which can waste more than 1000 litres of water per hour).
- Create windbreaks using plants or permeable materials such as trellis, or picket fences to reduce the effects of drying winds.
- Don’t over fertilise your plants, including lawn. This encourages a lot of growth, which increases the water needs of the plants, and results in soft growth that is more easily damaged by mowing and/or harsh conditions.
- Add wetting agents (found in a garden centre), to your garden beds. This helps improve water penetration into and through the soil, reducing water lost through evaporation and runoff.
- Soil wetting agents, and water storing granules, can be added to potting mixes to reduce the need for watering containerised plants. Be sure the size of any container is suitable for the plant/s in them. If the container is too small, they will require very frequent watering.
If the container is too large then you might be wasting water (the plant roots only fill a small amount of the media in the container). Containerised plants can also be lightly mulched to reduce evaporation losses from the media.
- Reduce the amount of lawn you have by replacing it with beds of plants with low water requirements, or choose lawn species that have good drought tolerance.
Reducing the need to water your lawn can save you a lot of water. You can also allow your lawn to “brown off” during hot, dry conditions. It will generally regrow very quickly once conditions improve (higher rainfall, cooler temperatures).
- Fixing, or replacing worn or leaky hoses, nozzles, sprinkler heads, timers, etc. can save quite a lot of otherwise wasted water.
- Use part circle (e.g. quarter, half, three quarters, or adjustable radius) sprinkler heads to reduce waste from watering areas that don’t need it (e.g. paved areas).
- Selective pruning of very leafy plants after the spring growth flush can reduce the water needs of the plant during summer (the less foliage the less water lost through the leaves). This needs to be done carefully to avoid damage to the plant.
WATERING SYSTEMS
A watering system can mean the difference between your garden thriving or struggling. It can also reduce the time you spend bucketing or hosing water onto your plants.
Take Stock
Have a good look over your garden. Think about the things that required so much time watering last year, or the plants that suffered most because you never got around to watering them.
Every garden is different. For some people, it’s the lawn that suffered most; for others it’s the pot plants on the veranda; and for others it may be the vegetable garden.
Target those problem areas for an irrigation system that can deliver regular water. You’ll be delighted at how much difference regular watering makes.
DIFFERENT GARDENS NEED DIFFERENT WATERING SYSTEMS
Garden beds
The type and design of the irrigation system you choose for a garden bed will depend on a number of factors:
- The type of soil – Sandy soils will readily absorb water, whereas clay soils can only absorb a small amount of water at a time. Sprinklers and sprays usually work well in sandy sites, but you will probably need to install micro sprays or drippers for clay garden beds.
- The layout of the garden bed will determine where you can install irrigation outlets. Placing a sprinkler right next to tree or bushy shrub will prevent an even distribution of water.
- Established plants may not need any additional irrigation.
- Areas under trees may need extra water.
- Garden beds with annual plants and vegetable seedlings will need to be kept from drying out.
- Some plants, particularly roses, are prone to fungal diseases. Do not direct water onto the leaves of these plants.
For Hanging Baskets
Hanging baskets are very prone to drying out, especially when they are exposed to the sun and wind. Because sprinklers and sprays will wash out the potting mix, it is best to water them with micro sprays or drippers.
Tubs and Pot Plants
Like hanging baskets, pots are best watered with micro sprays or drippers.
Sprinklers
Different sprinklers have different features.
- Costs vary.
- Pop up sprinklers will slip back into the ground after use. These can be a blessing in areas with lots of people walking or running around.
- Depending upon specifications, sprinklers can be adjusted to send the water at varying angles and at variable arc.
- Different materials provide varying levels of durability.
- Some sprinklers will only operate when there is sufficient water pressure.
Designing Your System
The number of fittings you can attach to your irrigation system will depend upon how much water flows through each fitting. Calculate the flow rate through your tap (see below), divide this by the flow rate through the type of fitting you want to use, and this will give you the number of fittings you can attach to each pipe.
NEVER put different types of fittings (e.g. sprinklers and drippers) on the same pipe. The different flow rates will mean that one or other of the fittings will not work at its optimum level. If you require different types of fittings, use a separate pipe.
If you need to have more than one pipe, you will need to install a manifold at the tap. This is simply a mechanism for turning the different pipes on and off.
Remember, if the water has to flow up hill, you will lose water pressure, which will simultaneously lower the flow rate. The flow rate will also be lowered if you operate other taps when you are irrigating.
Alternatively, if the water is flowing down hill, the water pressure will increase. If the flow rate is higher than what is required for your system, you will need to be careful you don’t turn the tap on too hard as this may cause the fittings to break apart.
How to Calculate Flow Rates
- Turn off all taps around the house.
- Place a 10 litre bucket under the tap.
- Turn the tap on full.
- Time how many seconds it takes to fill the bucket.
- Divide the time taken by ten to give you the rate (litres per second) that water flows through your tap.
Dripper or Spray?
Drippers take a long time to water a garden area. Water from sprays can evaporate and/or be blown away by the wind.
Cheap Micro-irrigation
Micro-irrigation systems are easy to install yourself.
Use high density polyethylene (HDPE) pipe. This is flexible and easy to cut and join together. This type of material is best suited for use with micro sprays and drippers. Its flexibility makes it ideal for irrigating pots and hanging baskets.
There are some disadvantages to using HDPE pipe and fittings:
- Above-ground fittings are easily damaged.
- Pets and other animals can ruin fittings trying to get water.
- Sunlight can cause some plastic heads to go brittle.
- Reach may be limited.
- Small pipes may become clogged (this problem can be minimised by including a filter).
- Small pipes may be cut by spades, secateurs, picks etc.
Handy Hint!
When installing a new micro irrigation system, lay the pipe in the trench. Before you install the fittings, run water through the system. This will straighten the pipe and ensure that fittings will be correctly positioned.
Assessment
Assessment is based on a combination of completing all assignments and sitting for a final short one and a half hour exam, in your own location.
If you don’t cope well with exams then you may elect to undertake a project instead. This is a popular option.
In addition, most modules have a Set Task at the end of each lesson placed before the assignment. This is an opportunity to undertake practical work to help you acquire knowledge and skills and practical experience. This ADL feature is an added bonus not found at most online schools. Set Tasks are not required for assessment.
Some courses also have optional Self-Tests which are available on our online learning platform. These are not available by correspondence or by USB, and do not form part of your overall grade.
How our courses work
- Choose Your Learning Method
You choose how you would like to receive your course material, i.e., Online, USB or Correspondence. The choice is yours. You may also work on online or offline. - Tutor Allocation
Every student is assigned their own dedicated tutor who is an expert in their subject area. They provide as much or as little individual contact as you require. You can contact your tutor whenever you need – your hours are not limited. - Feedback and Assignments
Tutor Feedback is an essential component in helping you understand the subject matter. Tutor feedback is given in the form of notes written on the assignment. We encourage you to contact your Tutor where help with clarification and understanding of course material may be required.
Your assignments are located at the end of each lesson. You submit them for marking whenever you are ready. There is no time limit. - Set Tasks and Self-Tests
Most modules have a Set Task at the end of each lesson before for the assignment. This is where you get the opportunity to undertake practical work to help you acquire knowledge, skills and practical experience. Many modules also have short Self-Tests. - Exams
Once all assignments have been completed you may then elect to sit for a one and half hour exam in your own location. If you prefer not to take the exam you do have the option to undertake a project instead.
Once the exam or project part of the course is completed, your Certificate is then processed. Please allow approximately 4 weeks for this. - Design Your Own Qualification
ADL offers students the flexibility to self-design their own qualification – bundling together a combination of 100-hour modules into a qualification higher than a certificate.
FAQ
FREQUENTLY ASKED QUESTIONS
Here is a list of the most often asked FAQ’s.
General
Q. Why should I enrol with the Academy for Distance Learning?
A. Here at ADL, our students are our priority – we treat everyone as a unique individual.
Q. Do I need to buy text books?
A. No, as each module has been written by highly qualified industry professionals. The content of the material is presented in such a way that text books are not required. However, if you require additional reading your tutor will be able to supply a list.
Q. What happens if I have to stop studying for a while? (eg. become sick, go on holidays, have a baby, move house, etc)
A. It’s OK to take a break and start up your study at a later point in time. Just let us know.
Q. Is there an age limit?
A. There is no maximum age limit. We do however, have a minimum age limit of 18 years. Below that age parental consent would be required.
Q. Are your courses up-to date?
A. Our courses are revised and updated on a rotation system.
Q. Do you have a Cancellation policy?
A. Yes. We have a cancellation policy that is fair and equitable. For further details please click here.
Q. Will I have any opportunity to engage with other students?
A. We have a Student Community group based on facebook! If you don’t have a facebook account already, you could make one just for talking with fellow students on the group.
Enrolment
Q. When can I enrol/start?
A. You may enrol and start at any time of the year – it’s all self- paced.
Q. Can I study from anywhere in the world?
A. Our courses are available to anyone, anywhere in the world from the comfort of your own home. The course content is relevant to any country, culture or economy.
Q. How long do I have to complete the course?
A. You complete the course at any time that is convenient for you.
Q. Completing a 100 hour module – how long will it take?
A. For some students a 100 hour module will take approximately to 3- 6 months to complete. Others take less time and some even longer.
Assessment
Q. Assessment – how does it work?
A. For each 100 hour module you are assessed by assignments (at the end of each lesson) and a final one and a half hour exam (or you may elect to complete a Project, instead of sitting the exam) – the choice is yours – you sit for the exam in your own location.
Q. I don’t cope well with exams – what can I do?
A. You may elect to undertake a Project (set by your tutor) instead of sitting the exam. Projects are completed from your home and can usually take a couple of weeks to complete.
Q. If my assignment is not up to standard is there an opportunity to resubmit my work?
A. Yes –
Q. How many assignments do I need to complete for each module?
A. At the end of each lesson, there is an assignment – so if a course has say, 10 lessons, there would be 10 assignments.
Q. I am having difficulty attending workshops/industry meetings, what can be done?
A. If your course requires attendance at workshops, conferences, or industry meetings; alternative arrangements can be made in your country.
Qualifications
Q. What qualification will I receive?
A. For individual modules, you would be awarded a Certificate endorsed by TQUK (Training Qualifications, UK), providing you complete all assignments and the exam. If you just want to complete only the assignments and not sit for the exam or finish a Project, then a Letter of Achievement would be awarded. For more details on qualifications available please click here.
Q. Can I customize my diploma/higher qualification?
A. Not all educational institution’s certificates /diplomas meet everyone’s needs. The opportunity to Design Your Own Diploma at the Academy (subject to our approval) is an added bonus, not found at other colleges. You choose modules that you think will help you in achieving your goal.
Q. What do I get when I complete the course? Will I receive a transcript?
A. At the completion of all courses and providing all assignments and exam requirements have been met, you will receive your Award and a Transcript.
Tutors
Q. Our tutors – who are they?
A. We appoint Tutors and require that they must be currently active in their industry, with at least 5 years’ experience in their chosen profession.
Q. Can I contact my tutor at any time?
A. Yes – you have unlimited access to your tutor via email through our Online Classroom. You can always leave a message with ADL requesting your tutor to contact you. You decide on how much or how little contact you wish to have.
Q. Practical work – How is this done?
A. To find out more about this part of the course please visit the section on How Our Courses Work here.
Career Options
What's Included
What your tuition fees include
- All Course Material via Online, USB or Correspondence
- Assignments Marked
- Professional Tutor Feedback
- Set Tasks - Practical Exercises to help you develop skills
- Self-Tests – multiple choice questions at the end of lessons in most modules
- Unlimited Personal Tutor Support – via our student classroom
- Committed and Friendly Admin Support – vital to your success
- All ADL Exam or Project fees (exception RHS exams)
- Qualification Certificate
- Official Transcript with assignment grades
- Student Manual
Plus FREE
- Academic Writing course (optional - 10 hours only)
- Critical Thinking course (optional - 10 hours only)
- Job Seekers Careers Guide
- Study Tips on How To Study Better
- Career Counselling by ADL Staff
- CV Writing Help, Tips and Advice
There are no hidden extras
Career Opportunities
FAQ - RHS Theory Qualifications
GENERAL
If you require further details about any of the RHS industry recognised qualifications please, call one of our friendly RHS Course Advisors on +44 (0)1227 789 649 or email: [email protected]
Q: When can I Enrol/Start My RHS Course With ADL?
A: Anytime, Anywhere. There are no enrolment deadlines.
Q: I live Overseas. Can I Study From Overseas?
A: You can study any of the RHS theory qualifications overseas. All courses are offered in English. You will need to email RHS Qualifications direct to arrange sitting for your examination overseas.
Q: Is There a Time Limit for Completing an RHS Qualification?
A: At present there are no time limits. However, RHS is contemplating in the future, the introduction of course time-lines.
Q: Are There Any Entry Requirements (Pre-Requisites)?
A: The RHS Theory courses do not require prerequisites, previous experience or any knowledge of horticulture. You just need passion for all things horticulture.
Q: What Course Should I Start With First? I Am New To RHS Qualifications.
A: We highly recommend that you start with Level 2 – Principles of Garden Planning, Establishment and Maintenance.
Q: What Does ADL Course Material Include?
A: Includes Power Point Presentations, Videos and written course lessons.
RHS EXAMS
Q: When Do Exams Take Place?
A: Exams are held on fixed dates in February and June of each year. You should register as a candidate at least 3 months before these dates, so please do not leave exam registration to the last minute
Q: Where Do I Take My Exams?
A: UK: You take the exams at the RHS Wisley Centre, located between Cobham and Ripley in Surrey or at other authorised RHS centres around the UK.
Overseas: please email RHS qualifications direct for centre information.
Q: Exam Pass Marks?
A: Module – pass 50%. Commendation 70%.
Qualification: 50% pass for all modules.
Commendation awarded for all modules.
Each question carries a value of 10 marks.
Q: I’m Not Happy With My Exam Results?
A: You have the opportunity to re-sit your exam at the next opportunity.
There are no restrictions on the number of re-sits you can take. The highest mark you achieve will remain.,